
Thursday, May 31, 2012
54%
On the radio this morning, they were talking about the newly released divorce rate statistics. Did you know that 54% of 1st time marriages end in divorce? I realize everyone is aware of the whole “one in two marriages end in divorce” saying, but at some point you just kind of hope that little tidbit is a myth. Know what I’m saying?
And don’t even think about remarrying divorcees. If you were to remarry, the divorce rate jumps up to 60something percent. And don’t get to thinking the third time is the charm. Entering your third marriage jumps the divorce rate up ANOTHER 10 percent to 75%. How do you even average that out if one person is in their first marriage and the other person in their second?
One other statistic I found ridiculous was that 30% of women new from the start their marriage wasn’t going to last. How is that possible? You know its not going to last but yet you do it anyways? That’s as if you know the stove is hot, but you just have to touch it to make sure. You’re going to get burned! Step away from the wedding dress!
Are people so scared to be alone that they will just jump willy nilly into a marriage they know is doomed from the beginning? There are 7 BILLION people on this earth. I promise you won’t be alone forever if you drop that dirt bag you’ve been with for the last 2 years and raise your standards a little bit. There’s no need to rush into these things, we live a long time these days people.
Hopefully I didn’t piss anybody off with my comments. The cynic in me is rearing its ugly head today. I’ll try to type some happy thoughts tomorrow.
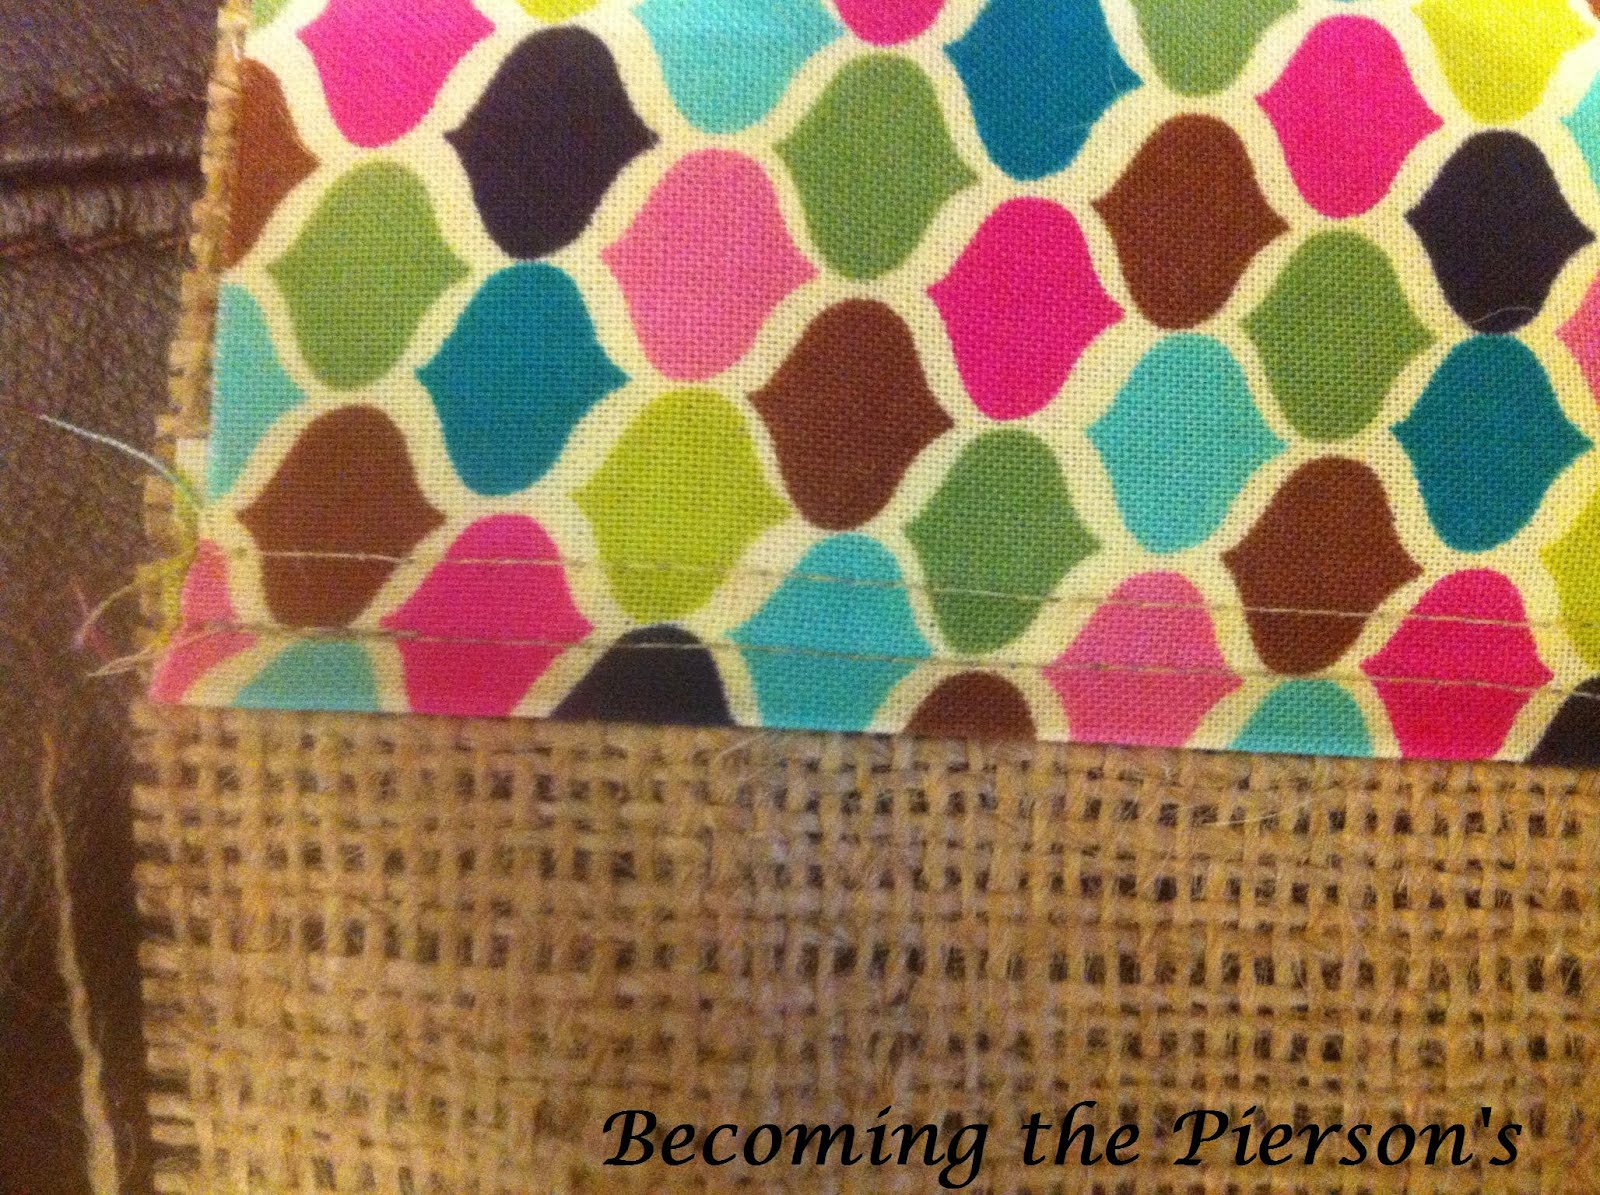
Wednesday, May 30, 2012
Burlap Tote Tutorial

I managed to create the above tote bag for my FSIL as a birthday present by following this tutorial for the bag construction. I added the J before starting. I cut out the J in the accent material and placed it on the piece of material that would be the “front”. Then I cross stitched around it so that it would stay in place.
I decided to expand on my tote creating prowess after I saw this:
I started out by drawing up a pattern and making some notes:

Yup.....this is how it all started folks. My, ummmmm....sketch (we wont craft blasphemy anymore by calling this a pattern) basically laid out which sides of what material would need to be hemmed before starting the actual construction, and which edges could stay raw. Impressed yet?
Then I gathered my supplies:

The burlap material is going to be used as the outside of the bag, and material with the larger pattern is going to be used as the liner. The accent material with the small pattern is going to be used for the monogram, handles, and the strip around the top.
Next, I decided on the tote size. I eventually settled on 18.5 x 19’. I wanted them to be big enough to carry a towel and other beach necessities.
Then, I cut out the letters for the monogram that would go on the front. I was making four bags, with four different monograms.

After cutting the initials, I cross stitched the initial to the center of the bag.

Next, I tackled the strips that would go around the top edge. I cut the accent material into 4 inch by 19 inch strips, two for each bag. And this is where it gets tricky to explain. Three of the edges of the strip can remain raw because they will be sewn into the bag. These three edges are the top edge and the two 4 inch sides. The bottom edge of the strip that will be placed closest to the initial will be visible after the bag is finished so it will need to be tucked under and given a clean hem. I ran the sewing machine over it twice to give it a more finished look.
Once the initial is cross stitched and the strip is sewn on, all the tricky parts are done! All you have to do now is follow the rest of this tutorial to finish the bag.

It really was pretty easy once all the little extras (letter and accent strips) were sewn on to the burlap. I just pretended that the initial and strip at the top were part of the burlap. Although, I guess it’s not really reversible anymore. Or it can be if you don’t care about the monogram. But to me that’s the best part!

I’ve spent all this time making everybody else one, I have YET to make myself one. Think I’ll ever get around to it?
Tuesday, May 29, 2012
Bachelorette Party Goody Bags
Oh man, oh man, oh man! I am so excited to finally be able to post this. I am terrible with secrets and have had this post written for about the last month, just waiting for my bachelorette party to get here so I could share!
To recap, my friend Wendy is AMAZING and is throwing me a bachelorette party at South Padre Island. She has taken care of everything by organizing everyone’s arrival time’s, booking a condo, and even flying in with my sister to make sure she gets here with no hassle (I’m pretty sure she’s never flown by herself before). I wanted to somehow show her, as well as the other three women who are attending, my gratitude for spending four *fingers crossed* sun filled days at the beach with me. So I put together these little goody bags for them to show my appreciation.
I made each girl a tote, thinking they could use it to lug their towel, sunscreen, and other odds and ends to the beach or pool. I managed to monogram them for each one, and luckily enough, no one has the same first initial!

Our condo comes with its own private pool, so I bought these cups for whatever our concoction maker happens to mix together.

I also had these koozies made online for any drinks that happen to come in a bottle.

And what’s a trip to the beach without a towel! I kind of splurged on these, but I wanted to make sure to get the good ones. Nothing worse then a trip to the beach with a tiny or itchy towel.

Last, but certainly not least, I put together a travel kit that included sunscreen, aspirin, mints, and hand sanitizer. Sorry, no pictures from here. But I did buy it all in the Target toilettries section.
I think they’ll like them. What’s even better is they are a complete surprise! (Love giving them, but hate receiving them!) Nobody knows about them except Michael and my friend Christine. And I won’t post this until AFTER they receive them. I can’t wait to see their reactions!
Thursday, May 24, 2012
Flowers
I’m sure this subject will be just as riveting for you as it was for me. But I know how important it is to most, so I figured I should include it. Not going to lie, when I started talking flowers with the florist, I zoned out a few times. So I do not blame anyone in the least if they choose to skip today’s post. No wonder Michael said I could handle this part on my own. What a punk.
So, now that we’ve set the tone for this post, I’m mainly going to leave the rest to pictures and just tell you what I like about each of them.
If you remember, this is what my original inspiration was:

My intention is now to leave about half of the bud vases with candles, and fill the other half with flowers. In the center of the table with be a blue mason jar to create the “center” piece.
I like baby’s breath. I like the simplicity. I like the color. And I love the price. Unfortunately, they tend to stink for most people so we will try to limit them to the great outdoors.


And if they happen to carry indoors, we will leave them mainly in small quantities such as the bridesmaid’s bouquets and the groomsmen’s boutonnieres.


I want the centerpieces to be mostly white, but if light pinks, peaches, blues, or whatever filter in, I’m not opposed. I’m hoping the centerpieces are filled with peonies, hydrangeas, garden roses, mums, dahlias, and daisies. I know some of these are out of season, but I trust our florist in making good decisions, and finding good look alikes


And then to fill the bud vases, I asked for more dimensional flowers such as billy balls, thistles, spider mums, fern fronds, whatever those little flowers are in the first picture that I boxed, and anything else she can find.


Haha, did your eyes glaze over too? I’m just glad I included pictures.
Wednesday, May 23, 2012
Saying Thanks
I don’t know about you, but whenever I receive a gift, I feel VERY awkward to not be giving one back. I feel that whatever you give should be of equal, if not greater value then what you receive. It’s just good manners.
Hmmmmm……that reminds me of somebody else.

I love that show (and the above comic is HILARIOUS). I love how he breaks down societal mannerisms and makes them sound so scientific. Hilarious!
So if receiving a gift and not returning one in exchange is bad, you can imagine how awkward/terrible/unappreciative I would feel if I was to receive a WHOLE party. Especially an entire party where everyone brought little old me something and I couldn’t return the favor.

So what’s a girl to do? Pinterest to the rescue!

Ahhhhh! I love this site! It’s amazing! It is worth EVERY exclamation point you see in the above sentences (including this one!)!!!!!!!!!!!
To start off, every gift needs a card. On Pinterest I was able to find a cute pdf file that I could save, print, and then customize by penning a personal note inside. I think they’re cute and could really work for any instance when a “thank you” is needed.

As far as what to give, there’s no way you can follow the above rule (giving/receiving gifts of equal or lesser value). So you have to remember, it’s the thought that counts. Especially when one of your showers is being hosted by EIGHT(!) lovely ladies. That’s right. That is no typo. One of my showers is being hosted by a total of EIGHT(!) people. So I have scoured Pinterest to find some budget friendly hostess gifts.
I am tending to lean towards an edible gift, and I have found two options that I love below. Who doesn’t like cookies or bread? And while I’m not personally a fan, most women can’t pass up anything with chocolate chips in it.


Or I could go with this cute little number. Buy a few oven mitts and fill with random kitchen necessities.

Or, since it is a “shower”, I could mix up some bath scrub (instructions were provided!) and hand these out to each of the ladies. And that bottle is soooo cute with the twine tied in a little bow.

I’m leaning more towards one of the top two options because (#1) they're edible (love food!) and (#2), I already have some mason jars that I could use to hold all the food/bread ingredients. Which do you think I should go with?
Tuesday, May 22, 2012
Mission: Accomplished!
If you remember, or paid attention, or had nothing better to do then sit and wonder “hmmmm....did Megan accomplish all she had set out to do this weekend?” I’m here to let you know, I did! Everything went great and according to schedule. I love it when a plan comes together.
However, there were a few casualties from the drive…..

But hey! All’s fair in love and wedding planning right?
#1: Bridal Portraits
Vindication! My crazy ideas totally paid off!
If you remember, I had a few crazy ideas as to what I wanted my bridal portraits to look like. They included a couch in a field as well as a live animal. I didn’t really talk too much about it, other then on a strictly need to know basis. But everything went VERY well, and I can’t wait to see how the pictures end up looking! And that’s all the information you’re going to get out of me regarding that (at least, for now).
#2: Yum! Cake!
And not just any cake, it’s going to be a Funfetti cake! Which makes it twice as much fun! It will be covered in buttercream icing which will also make it twice as delicious! We’re going to have four amazing tiers, each one bigger then the next, covered in cute little ruffles.
Let’s take a short little trip back in time to revisit some of my previous ideas. Or for a more direct exit, see below! It will look close to this, plus two tiers and minus those flowers.

Everything IS bigger in Texas. And better! Although I might be slightly biased.
Sunday, May 20, 2012
Kickin It Old School
I fought it tooth and nail in the beginning. I hated labels (if you remember) and didn't want them applied to our wedding. Still don't for that matter. The straw that finally broke the camels back (my poor, tired, worn out back!) was when I went for my dress alterations. When I first arrived, Penny (the nicest woman ever who did my alterations) had me change into my gown. And you know what her first comment was? Well, after telling me how great I looked? She quickly followed the compliment with "I love it! It's so vintage!" And that’s all she wrote folks! I quit fighting and just accepted it, vintage would be a part of our wedding.
My name is Megan Henderson, and I like vintage crap.
Soooooooooooo, now that I’ve faced the music, we'll be kickin it old school down south at the Henderson-Pierson wedding. And I can't wait!
We'll be surrounded by a combination of vintage table decor including milk glass bud vases and turquoise mason jars, and country chic (real description, I swear!) burlap table runners will run the length of the tables.
Our
I'm not ashamed. We're Country where I'm from. And the great thing about being Country (Country is being used as a name, dang autocorrect, so yes it does deserve to be capitalized!)? It’s back in style! And THANK GOODNESS, I might add.
It's a trend. I get it. But this trend is sooooo much better then others gone past.
I.e. mustaches:

I'm not even kidding, this is a real picture from somebody's real wedding. I see regrets in their future when looking back at these pics with their kids.
Tiered wedding cakes with bridges displaying the entire wedding party:

I think a picture is worth a thousand words. Well, maybe not this one word: NO!
And celebrity weddings that can't make it past the next full moon:

Really Kim? You MADE that cash money off your wedding and you couldn’t stay married longer then 75 days? It took you longer to wiggle your way into that dress then it did for you to wiggle your way out of that sham of a marriage.
Too harsh? Maybe. But totally deserved.
I can honestly add that I'm pretty sure we won't look back at our wedding pics and cringe. But I guess everybody says that. Let's keep our fingers crossed that vintage is another word for timeless!
Thursday, May 17, 2012
Have Your People Call My People
Just kidding, I’ll still answer your phone call. Maybe (sorry Dad!). But seriously, I mean it. I’m booked for the next two months. And after that, I think I’m taking a few weeks off from everything other then my kindle and a chair by the pool. Other then work, I’m not doing nothin’ but reading and being a wife. That sounds really weird. But like I mentioned to Michael the other day, as long as things keep rolling like they have for the last (almost!) three years of our relationship, I’m pretty sure we’ll be just fine.
This weekend starts the final two monthish stretch to the wedding. I’ll be finishing some of the little details this weekend in Seguin (that I can share with you next week!), and next weekend I’ll be in South Padre. Then we go back to Seguin, and then Florida. Me and the car are going to become VERY good friends. I’m sure we’ll be bffe’s after this summer.
There is light at the end of the tunnel though. Hopefully this is the last summer I have to spend on that concrete hell they call Highway 35. And coming to Dallas is how I met Michael, so that’s a good thing….haha it’s a great thing! It’s crazy to think how the little decisions I made along the way has lead me to where I am.
Just think about it. What tiny decision did you make at some point in your life, that if you had done the opposite, your life would be completely different? And honestly, probably not had as good of a life as you have now?
A lot of people are filled with regret when they ask “what if?”
That is the last emotion that comes to my mind (oxymoron anyone? Hint: emotions don’t originate in the mind!) when I ask that question. I’m just glad I had the guts to make the move, or my life would not be as great as it is now, that is DEFINITELY for sure.
Wednesday, May 16, 2012
Music
Saturday night we had concert tickets to see Jerrod Neiman, Chris Young, and Miranda Lambert. We were late and missed Jerrod, but Chris and Miranda were awesome! They really know how to throw a party/concert.

This really does pertain to the wedding! I swear. But let’s start at the beginning…..
We had been tossing around a few ideas for our first dance. The top two contenders were “God Gave Me You” by Blake Shelton and “Crazy Girl” by the Eli Young Band. Both had their pros and cons.
“God Gave Me You” would be easier to dance to, but our band doesn’t play it yet, so we would have to make a special request that they learn it; which was doable. Our band’s contract came with the stipulation that they would learn two extra songs at no cost, if we wanted them to play something that they didn’t already know.
“Crazy Girl” (not exactly my favorite since the “crazy girl” would imply ME! But whatevs) is a modern waltz and would be tricky to dance to, but we both like it and the band already knows how to play it.
This wasn’t a decision we were going to kill ourselves over or spend hours/days/weeks agonizing about. Both of us were willing to compromise and would have been fine with either (who'd of thunk it?).
And enter amazing concert by Chris Young stage right.
Saturday night, we entered the pavilion, grabbed a beer, and headed to the lawn with our blanket. We finally found a spot (the place was already packed), spread our blanket, and settled down to enjoy the show. We were just in time to watch the Chris Young part of the show. He was starting to wrap up and play his last song, when I leaned over to Michael and said, “This would be a fun song to dance to”. He leaned back on his elbows, got this look on his face, and then said, “Yeah, I like it”. And just like that, decision made!
I’m excited! We actually both whole heartedly agree on something! Now we just have to make sure the band can learn it. Keep your fingers crossed!
Even when we go to non-wedding events, we get wedding stuff done. We are so efficient!
Tuesday, May 15, 2012
Delegating
It means trusting someone enough to complete the task without oversight. It means I am no longer responsible for completing the task. It means to stop being a control freak.
It means taking it off the TO DO LIST and stop freaking WORRYING ABOUT IT!
It seems so easy in theory, but the actual execution sure is a b!atch.
The few things I have delegated to someone else to complete, I feel like I have spent so much time worrying if they are actually going to get done, that it would have been easier to do them myself.

This is how Michael probably feels. Oh well. 2 months to go…..
Monday, May 14, 2012
Brooch Bouquet Tutorial

This is ultimately how I wanted my brooch bouquet to look. I read a few tutorials and decided that this one and this one were very helpful. In the end, this one was what worked for me.
If you know me, you know that I’m a short cut taker. I like to get the job done as quickly and efficiently as possible. Reading both of the tutorials, it seemed like a lot of work was involved in the initial steps of twisting many strands of thin floral wire around each brooch to strengthen the “stem” and hold the brooch in place. What I couldn’t figure out, was why people did this, when there was a much thicker wire right next to the thin gage wire, that would be able to hold the same brooch up with only one strand versus what seemed like a thousand?

Being the efficient person that I am, I snatched up a couple rolls of the thicker gage and went to town. Instead of twisting it around the pin of the brooch, I simply pulled Earl out and glued an L shaped piece of wire to the back. I made sure that the long side of the L, which would be the stem, was at least a foot long. I wanted to make sure there would be enough length to play with when making the actual bouquet.

So I rinsed and repeated about a bajillion times. And there were a couple casualties. I found on one or two of the silver brooches, that if they sat too long, the glue could just be peeled off (that big one in the left hand corner was one such casualty). It seemed like the weight of the brooch overpowered the adhesiveness of the glue. Oh well; can’t win them all.
The next step is where it gets a little dicey. I read one tutorial that instructed to create a few mini bouquets, and then combine them. This did not work AT ALL for me. I found the easiest thing to do was combine the larger brooches to create a mini bouquet, and then secure them with duct tape. I slowly added two or three brooches around the sides, and would wrap with duct tape again. I never tried to add more then four at a time, because it got a little tricky when trying to tape them. It was basically a huge puzzle where I had to fit all the brooches together.

You can see all my supplies in this picture. They included needle nose plies, wire cutters, duct tape, thick floral wire, and Earl, just incase.


Once I had assembled the bouquet, I cut about eight strips of burlap six inches long by two inches wide. I used these to hide the bottom of the bouquet that would have shown all the stems. I folded them over, and then used duct tape to secure the two loose ends at the base of the bouquet, where the stems all came together.

Don’t mind Earl, he’s just hanging out.
Then, I made sure everything was wrapped nice and tight in duct tape. You can see I chose a very bright colored tape. I covered the stems in burlap, making sure it folded over the bottom and covered up the wire at the bottom.

Then, I wrapped the bottom in twine! None of that girly, phoo phoo ribbon crap here. I started at the top of the bouquet, working my way all the way to the bottom. Once I reached the bottom, I worked the twine back to the top.

Once the twine made it back to the top, I secured the loose twine with my hot glue gun. I tried using corsage pins like the tutorial suggested, but couldn't get them to go in all the way.

I left a loose piece of twin because I’m still debating adding my Aggie ring to the bouquet for the night.
And that, my friends, is how you make a brooch bouquet.
Subscribe to:
Posts (Atom)

